Wednesday, 1 September 2021

CIW - Web Developer and other certification

So twenty years ago I passed an exam by the Certified Internet Webmasters (CIW). Whilst I've never been asked for it in a job application or a job advert the fact that someone has chosen to define a syllabus worthy of study is useful for those of us who want to structure our learning by means of certification exam passes. So here I give notes summarising what CIW vertification is curently offered.

First, we need to know the extent of CIW certication. Quoting from their page the CIW has 4 certification series which I give along with supposed salary ranges:

The CIW Web Foundations Associate is an omnibus of 3 individuals course and they are: Internet Business Associate (1D0-61A, 30 mins), Site Development Associate (1D0-61B, 30 mins), Network Technology Associate (1D0-61C, 30 mins), the aggregated course outlines are here. You can take the exams separately, or as an omnibus exam (1D0-610, 90 mins).

The CIW Web Design Professional certification consist of two exams: CIW Web Design Specialist (1D0-520, 75 mins) and CIW E-Commerce Specialist (1D0-525, 75 mins) with their respective course outlines here Web Design and E-Commerce.

The CIW Web Development Professional certification consists of three specialist courses and corresponding certification exams: CIW Javascript Specialist (1D0-735, 90 mins), CIW Perl Specialist (1D0-437, 75 mins) and Database Design Specialist (1D0-541, 90 mins) with their respective course outlines here JavaScript, Perl, Database.

The CIW Web Security Associate is the entry level CIW Security certification with a 90 minute exam, 1D0-671, here is link to course objectives. The higher security certifications imply requiring co-opted exam pasess from third parties but if you read closely then the CIW own CIW Network Technology Associate and CIW Web Foundations Associate seem to qualify so this implies an exam and money saving.

The new CIW Web and Mobile Design series consists of seven proposed certifications though only four are live. They are:

So now we have identified all the exams we can tabulate and provide some learning resource links

CourseCertification(s)ExamLearning Links
Internet Business AssociateWeb Foundations Assoc1D0-61A, 30 mins, £108Google
Site Development AssociateWeb Foundations Assoc1D0-61B, 30 mins, £108Google
Network Technology AssociateWeb Foundations Assoc1D0-61C, 30 mins, £108Google
Web Foundations Associate (Bundle)Web Foundations Assoc1D0-610, 90 mins, £108Google, Certlibrary.com, Google Books - Exam Q & A
Advanced HTML5 & CSS3 SpecialistWeb and Mobile Design1D0-620, 75 mins, £108Google
User Interface DesignerWeb and Mobile Design1D0-621, 75 mins, £108Google, Certlibrary.com, Google Books - Exam Q & A
CIW Data AnalystWeb and Mobile Design1D0-622, 75 mins, £108Google
CIW Social Media SpecialistWeb and Mobile Design1D0-623, 90 mins, £108Google
Web Design SpecialistWeb Design Pro1D0-520, 75 minsGoogle, Certlibrary.com
E-Commerce SpecialistWeb Design Pro1D0-525, 75 mins, £108Google, Certlibrary.com
Database Design SpecialistWeb Development Pro1D0-541, 90 mins, £180Google, Certlibrary.com, Amazon E-book
Perl SpecialistWeb Development Pro1D0-437, 75 minsGoogle, Certlibrary.com
Javascript SpecialistWeb Development Pro1D0-735, 90 mins, £108Google
Web Security AssociateWeb Security1D0-671, 90 mins, £108Google, Google Books Q & A (571 version)

Friday, 27 August 2021

Map friendly application names to localhost and port numbers

So, we'll all familiar with running various local web servers/services on our own computer and running them on the 127.0.0.1 ip address and various port numbers (because we cannot share an ipaddress and port number combination). So, it is the case that for local web servers one types into a browser address bar addresses like localhost:3002 or 127.0.0.1:4005. It would be better if we could give our local web servers/services friendly names and also drop the port number. That is the goal of this post.

Let us try to give two friendly names to two web services, we'll call them Luke and Leia.

When one types an ipaddress or a network name into a web browser address bar the port numner is assumed to be port 80 (for HTTP) unless specified othwerwise. So if I type in Luke into a web browser address bar then that actually signifies Luke:80.

It turns out that the necessary configuration to do map friendly names occurs in two places, the name to ipaddress occurs in the HOSTS file but the port routing is handled by an application called netsh.

Use the HOSTS file to map hostname to Ip Address

We'll do the hosts part first which is to amend the HOSTS file which (on my machine at least) can be found at C:\Windows\System32\drivers\etc\hosts. Note the hosts file has no file extension and so looks like another folder in the address but it really is a file. Take a backup of this file because if you mess up then your system will malfunction, ***this is your responsibility not mine***. You will need Administrator rights to amend the contents of this file and the whole directory.

If you are satisfied in taking responsibility then amend your hosts file to include the following lines...

# to allow friendly names for localhost web servers/services
127.0.0.2     luke
127.0.0.3     leia

You can test if this change has been applied by pinging Luke then pinging Leia so I get the output below and you can see the respective ip addresses in the output...

C:\>ping luke

Pinging luke [127.0.0.2] with 32 bytes of data:
Reply from 127.0.0.2: bytes=32 time<1ms TTL=128
...

C:\>ping leia

Pinging leia [127.0.0.3] with 32 bytes of data:
Reply from 127.0.0.3: bytes=32 time<1ms TTL=128
...

I still have the web servers running from the previous blog article (please read at least bottom part) and so I can now type into a browser and get the following...

http://luke:3002/
Bonjour le monde de port 3002 (2021-08-27 15:07:54)
http://leia:3003/
Hello world from port 3003 (2021-08-27 15:07:45)

It ought to be noted that ip address 127.0.0.1 is not the only loopback/localhost address, every ip address that begins with octet 127, i.e. 127.*.*.*, is a loopback/localhost address. So our ip addresses for Luke and Leia of 127.0.0.2 and 127.0.0.3 are both localhost addresses and so no network packets leave the machine they are always handled locally. It should be noted that 127.*.*.* means there are 256^3 loopback/localhost addresses, or above 16 million. So that should be enough! Especially when you consider we have yet to factor in all the combinations with port numbers!

So I am happy to have abolished the ip addresses and given the friendlier names of luke:3002 and leia:3003 but the port numbners need to go away so we will do that next.

Port Proxying

I am indebted to this stack overflow answer Using port number in Windows host file - Stack Overflow which highlighted the use of the tool netsh (and the hosts file above). In my example I going to use the following command to port forward for Luke and Leia...

netsh interface portproxy add v4tov4 listenport=80 listenaddress=127.0.0.2 connectport=3002 connectaddress=127.0.0.2
netsh interface portproxy add v4tov4 listenport=80 listenaddress=127.0.0.3 connectport=3003 connectaddress=127.0.0.3

You can use the command netsh interface portproxy show v4tov4 to display what you have just registered...

PS C:\Windows\System32> netsh interface portproxy show v4tov4

Listen on ipv4:             Connect to ipv4:

Address         Port        Address         Port
--------------- ----------  --------------- ----------
127.0.0.2       80          127.0.0.2       3002
127.0.0.3       80          127.0.0.3       3003

And now in the web browser I can abolish the port number...

http://luke/
Bonjour le monde de port 3002 (2021-08-27 15:07:54)
http://leia/
Hello world from port 3003 (2021-08-27 15:07:45)

You remove an entry with a command line like...

netsh interface portproxy delete v4tov4 listenport=80 listenaddress=127.0.0.2

Warning, I have come across some posts that say the Apache web server can hog all the localhost/loopback addresses and so if this is not working for you then you might want to stop Apache, the same applies to IIS Express.

One interesting point to note is that is appears that the entries are stored in the registry at Computer\HKEY_LOCAL_MACHINE\SYSTEM\CurrentControlSet\Services\PortProxy\v4tov4\tcp here is a screenshot...

Installing PowerShell 7

I installed PowerShell 7 because I wanted to use the Background operator & when running node web servers. The background operator & will run the command line in the backgroud and so not tie up a command window; it is a feature borrowed from the UNIX shell. It means I can run several web servers or other long running (or permananent) executables from a single command window.

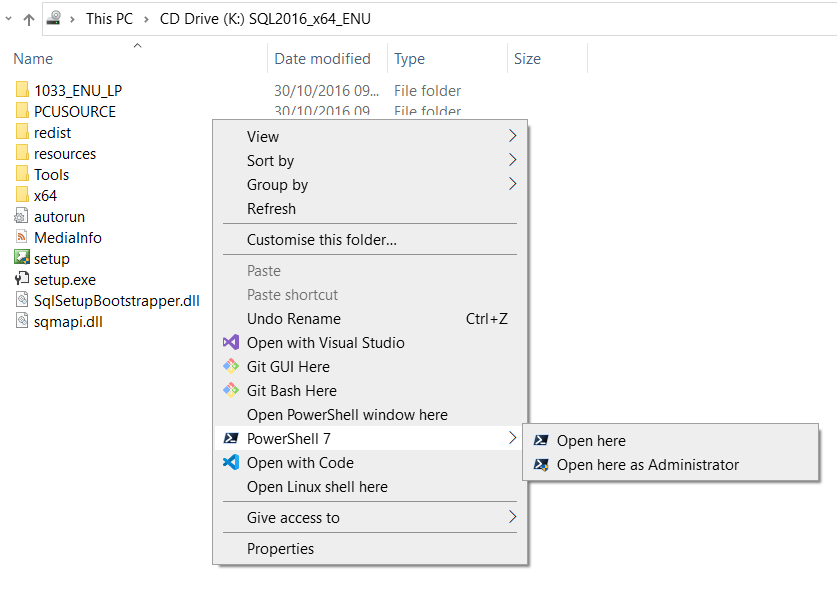
The other feature I want is the option to open a PowerShell command window from the context menu when in a Windows Explorer window. This already is working for my current version of PowerShell (5.1). I'd want it for PowerShell 7 as well.

It seems if you want the latest version of PowerShell, version 7, then you must deliberately install it. That is to say the Windows service packs and Windows updates did not upgrade my PowerShell from version 5.1 automatically. Here is the Microsoft web page for downloading and installing PowerShell 7.1.

The installer throws a series of dialog boxes which I have shown below, I took the defaults with the exception of the feature labelled Add 'Open here' context menus to Explorer. If I didn't take this option then I'd have to fiddle around in the Registry to get that feature working. Much better to turn on this feature at the install stage. The final screenshot shows the context menu feature working.

Multiple Background Jobs with Powershell

So now I am ready to run some instances of a node.js web server on different ports. Firstly, let me give some node.js source code. The following listing will return either Hello world or Bonjour le monde depending on the command line arguments on an ip address and port number also specified on the command line.

var args = process.argv.slice(2);

const http = require('http');

const hostname = args[0] || '127.0.0.1';
const port = args[1] || 3001;
const lang = args[2] || 'en';

const server = http.createServer((req, res) => {
  res.statusCode = 200;
  res.setHeader('Content-Type', 'text/plain');
  var timeStamp = new Date().toISOString().replace(/T/, ' ').replace(/..+/, '');
  var greet = (lang ==='fr') ? 'Bonjour le monde de port': 'Hello world from port' ;
  res.end(`${greet} ${port} (${timeStamp})`);
});

server.listen(port, hostname, () => {
  console.log(`Server running at http://${hostname}:${port}/ language:${lang}`);
});

So to run the above I'd run the following example commands ...

node.exe .\server.js 127.0.0.2 3002 fr
node.exe .\server.js 127.0.0.3 3003 en

Below is a screenshot of PowerShell 7 where I run these commands with the ampersand & operator which forces them into the background. You can see that Powershell reports then as a background running job. These jobs can then be terminated using the stop-job command supplying the job number.

Thursday, 26 August 2021

CSS Grid's 'grid-template-areas' are wonderfully intuitive

Finally, I have found a decent CSS grid layout technology. Twenty years ago, I used to use HTML tables to structure a page. Then we were told not to use tables and switch over to CSS instead but the CSS techniques at the time were inadequate and so I and many other programmers carried on with HTML tables. Now, I am happy to blog about CSS Grid's grid-template-areas which are wonderfully intuitive way to layout a page.

A really good YouTube video is Easily Structure your Layout with CSS Grid's 'grid-template-areas' and I have given the source code for this video below. I have also embedded the sample page into this blog entry, converting as required. You should find that this is a responsive page that will reduce to a column/stack if the browser's width is made narrow. The CSS has a 'mobile first' design in that the default declaration is for the reduced screen mobile stack whilst the media queries further down are where to find the full window declarations.

You really should watch the video in full but for those in a hurry the real essence is in the following extracts, first we have this grid-template-areas CSS property...

grid-template-areas:
    "sidebar header header header"
    "sidebar sect1  sect2  sect3"
    "sidebar main   main   main"
    "sidebar footer footer footer";

Then we have the HTML...

<body>
    <aside></aside>
    <header></header>
    <section></section>
    <section></section>
    <section></section>
    <main></main>
    <footer></footer>
</body>

Then these are tied together by specifying the grid-area property in each HTML element's CSS ...

aside { grid-area: sidebar; }
header { grid-area: header; }
section:nth-of-type(1) { grid-area: sect1; }
section:nth-of-type(2) { grid-area: sect2; }
section:nth-of-type(3) { grid-area: sect3; }
main { grid-area: main; }
footer { grid-area: footer; }

And that's it, full listing below. Speaking personally this will be my go to page when drawing up a web page from scratch. Enjoy!

Sample Page

Code Listings

index.html

<!DOCTYPE html>
<html lang="en">
<head>
    <meta charset="UTF-8">
    <meta http-equiv="X-UA-Compatible" content="IE=edge">
    <meta name="viewport" content="width=device-width, initial-scale=1.0">
    <title>Document</title>
    <link rel="stylesheet" href="main.css">
</head>
<body>
    <aside></aside>
    <header></header>
    <section></section>
    <section></section>
    <section></section>
    <main></main>
    <footer></footer>
</body>
</html></html>

main.css

body,
html {
    height: 100vh;
}

body {
    margin: 0;
    display: grid;
    grid-template-columns: 100%;
    grid-template-rows: repeat(5, auto);
    grid-template-areas:
        "sect1"
        "sect2"
        "sect3"
        "main"
        "footer";
}

aside {
    grid-area: sidebar;
    background-color: #007fff;
}

header {
    grid-area: header;
    background-color: #71b8eb;
}

section:nth-of-type(1) {
    grid-area: sect1;
    background-color: #B3D8FD;
}

section:nth-of-type(2) {
    grid-area: sect2;
    background-color: #5E86AF;
}

section:nth-of-type(3) {
    grid-area: sect3;
    background-color: #6D9FD2;
}

main {
    grid-area: main;
    background-color: #7DA9D5;
}

footer {
    grid-area: footer;
    background-color: #588EC3;
}

@media only screen and (min-width: 768px) {
    body {
        margin: 0;
        display: grid;
        grid-template-columns: auto 27% 27% 27%;
        grid-template-rows: 8% 30% auto 10%;
        grid-template-areas:
            "sidebar header header header"
            "sidebar sect1  sect2  sect3"
            "sidebar main   main   main"
            "sidebar footer footer footer";
    }
}

Links

Sunday, 22 August 2021

How do web servers tell the (Windows) operating system which port to listen on?

So I chanced upon a beautiful piece of sample C++ whilst wondering around the Microsoft website. Essentially the code creates an http server sample application. If we browse the code we can see that there is a line to register interest in a URL of which the port is a segment by calling HttpAddUrl.

Before we call HttpAddUrl we have to call first HttpInitialize and then httpcreatehttphandle; the latter passes a structure that we can pass into HttpAddUrl.

But now we can get to the heart of the issue: how to register interest in a port. Here is the method signature of HttpAddUrl.

HTTPAPI_LINKAGE ULONG HttpAddUrl(
  HANDLE RequestQueueHandle,
  PCWSTR FullyQualifiedUrl,
  PVOID  Reserved
);

The second parameter is a string, a URLPrefix string to be precise. The syntax and examples are given below.

"scheme://host:port/relativeURI"

https://www.adatum.com:80/vroot/
https://adatum.com:443/secure/database/
https://+:80/vroot/

To start receiving requests the sample code gives a function which handles each request, in this code there is yet another Windows API call this time to HttpReceiveHttpRequest.

And that is enough code, although we should tidy up and this is given in the code. Hopefully this clarifies the relationship between a web server and the (Windows) operating system.

There are some details about upgrading the code when using HTTP Server API Version 2.0. Other than that the code stands

All of this is for Microsoft Windows obviously, but I should imagine the process is similar for Linux and Mac OS.

Previously I have given code (twice!) that allows Excel to run as a web server: once in C# and once in Python. So, it would appear that for the adventurous some C++ Excel addin could also implement an HTTP web server! So that's a third way!

Saturday, 24 July 2021

JavaScript Notes and Queries: JavaScript's Prototypical Inheritance is simpler than TypeScript implies

In other posts on this blog I can write with authority rooted in deep experience. Lately, I have been revisiting JavaScript and cannot write on this topic with such confidence but I am keen to master web development. So I begin a new series called JavaScript Notes and Queries and the first topic is prototypical inheritance...

TypeScript, harbinger of change

I cannot write about all the previous versions of JavaScript nor give key milestones, I can only write as to my previous encounters. Decades ago, I remember JavaScript being the language used in web pages to handle mouse clicks etc. and little more. At my clients (Banks etc.) nobody was writing large scale projects in JavaScript. But Microsoft were and they found it wanting, so Microsoft invented TypeScript. Here's John Papa, Principal Developer Advocate with Microsoft ...

TypeScript is a language for application-scale JavaScript development. It’s a typed superset of JavaScript that compiles to plain JavaScript and was originally created out of a need for a more robust tooling experience to complement JavaScript language developers.

So, Microsoft concluded that ordinary JavaScript couldn't cope with large scale projects. The TypeScript tooling, specifically the online transpilers, that arose could be used to compare and contrast syntax patterns between TypeScript and JavaScript, of most interest to me was classes and inheritance.

TypeScript transpilers reveal JavaScript prototypical equivalence of TypeScript classes

Typescript 'transpiles' to plain JavaScript, and you can find tools on line to demonstrate such as TypeScript playground. I find this to be the best tool because you can change the target version of JavaScript. When I first encountered these JavaScript was still at ECMAScript 5, i.e. before the class keyword had arrived. We can play a game of time travel and restrict the target language to ECMAScript 5 by using the options menu. Then, we can write a TyepScript class and see the old school JavaScript equivalent.

Below is a simple class in Typescript (on the left) and its transpiled into old school JavaScript, specifically ECMAScript 5 (because ECMAScript 6 has its own class keyword) equivalent (on the right). Here is the link which you must paste in full because the source code is encoded in the url.

class Animal {
  name: string;
  constructor(theName: string) {
    this.name = theName;
  }
  move(distanceInMeters: number = 0) {
    console.log(`${this.name} moved ${distanceInMeters}m.`);
  }
}
"use strict";
var Animal = /** @class */ (function () {
    function Animal(theName) {
        this.name = theName;
    }
    Animal.prototype.move = function (distanceInMeters) {
        if (distanceInMeters === void 0) { distanceInMeters = 0; }
        console.log(this.name + " moved " + distanceInMeters + "m.");
    };
    return Animal;
}());

The JavaScript on the right is cryptic compared to the Typescript on the left but if you play around (add some more methods etc.) you'll discover the syntax pattern. The pattern is that methods are appended to the prototype property of the Animal object, this means all instances of Animal created will get a move() method, just like it was a class. Other lines in the JavaScript implement the contructor function. A class's modularity is reproduced in JavaScript by using the 'module pattern', this is established with an IIFE (Immediately Invoked Function Expression).

JavaScript's Prototypical Inheritance is simpler than TypeScript implies

So far so good. Now that we know how to append methods to the prototype we could just skip the Transcript and write the JavaScript directly. But what about inheritance? In Typescript you use the extends keyword. I've given a code listing example below and this link will take you again to Typescript playground but brace yourself for the transpiled equivalent for it is very, very scary.

class Animal {
  name: string;
  constructor(theName: string) {
    this.name = theName;
  }
  move(distanceInMeters: number = 0) {
    console.log(`${this.name} moved ${distanceInMeters}m.`);
  }
}

class Dog extends Animal {
  bark() {
    console.log("Woof! Woof!");
  }
}

So the transpiled listing is given below in all its scariness. Don't forget, we're deliberately choosing to target a version of JavaScript before the class keyword arrived. We're doing this in the name of investigation! All the really scary code is in the top code block which defines the __extends function.

"use strict";
var __extends = (this && this.__extends) || (function () {
    var extendStatics = function (d, b) {
        extendStatics = Object.setPrototypeOf ||
            ({ __proto__: [] } instanceof Array && function (d, b) { d.__proto__ = b; }) ||
            function (d, b) { for (var p in b) if (b.hasOwnProperty(p)) d[p] = b[p]; };
        return extendStatics(d, b);
    };
    return function (d, b) {
        extendStatics(d, b);
        function __() { this.constructor = d; }
        d.prototype = b === null ? Object.create(b) : (__.prototype = b.prototype, new __());
    };
})();
var Animal = /** @class */ (function () {
    function Animal(theName) {
        this.name = theName;
    }
    Animal.prototype.move = function (distanceInMeters) {
        if (distanceInMeters === void 0) { distanceInMeters = 0; }
        console.log(this.name + " moved " + distanceInMeters + "m.");
    };
    return Animal;
}());
var Dog = /** @class */ (function (_super) {
    __extends(Dog, _super);
    function Dog() {
        return _super !== null && _super.apply(this, arguments) || this;
    }
    Dog.prototype.bark = function () {
        console.log("Woof! Woof!");
    };
    return Dog;
}(Animal));

I took this code and then I started to remove lines to see what breaks, you might like to do the same as an exercise. I believe the variable b stands for base, d stands for derived and p stands for property. Much of this code is 'polyfill' code which acts to retofit modern features, so a lot could be removed.

My classes are simpler than others and so I could remove loads of code. My classes hold no state which is my preference these days. Without state, my classes have parameterless constructors and the need to call base class constructors is obviated; this also simplified matters.

I had thought that I had completely boiled down the __extends function to one line that uses the Object.create method ...

Dog.prototype = Object.create(Animal.prototype);

An alternative line of code is to the use

Object.setPrototypeOf( Animal.prototype, Creature.prototype )

I asked a pertinent Stack Overflow question while constructing a deeper class hierarchy. That question links to other relevant SO questions.

All this means we can arrive at a much less scary code listing below.

    var Animal = (function () {

        function Animal() {
            return this;
        }

        Animal.prototype.move = function (distanceInMeters) {
            if (distanceInMeters === void 0) {
                distanceInMeters = 0;
            }
            console.log("Animal moved " + distanceInMeters + "m.");
        };

        return Animal;
    }());

    var Dog = (function () {
        
        Object.setPrototypeOf( Dog.prototype, Animal.prototype )

        function Dog() {
            return this;
        }
        Dog.prototype.bark = function () {
            console.log("Woof! Woof!");
        };
        return Dog;
    }());

    var dog = new Dog();
    dog.bark();
    dog.move(10);
    dog.bark();

If we look in the Console in the Chrome Developer Tools then we can see out program's output. If we also type console.info(dog) and expand the nodes then we can see our desired inheritance tree ...

Our target inheritance tree

Speed Warning

Unfortunately that is not the end of the story because during my research I cam across this MDN article which says that the Object.setPrototypeOf technique is ...

Ill-performing. Should be deprecated. Many browsers optimize the prototype and try to guess the location of the method in memory when calling an instance in advance; but setting the prototype dynamically disrupts all those optimizations. It might cause some browsers to recompile your code for de-optimization, to make it work according to the specs.

Clearly, I need to do more research. I will return to this topic...

Links

Other links that maybe useful...

Wednesday, 21 July 2021

Use Python to write file tags from Excel VBA

This post was prompted by a bounty on a Stack Overflow question which details VBA code that can read file tags; questioner wants to know if VBA can write these tags as well. Sorry to say that I do not know of any current VBA referencable type libraries (there was once a DSOFiles.dll but not on my current machine). Instead we can leverage the comprehensive Python ecosystem and create a Python class callable from Excel VBA, below is a Python listing for the FilePropertiesSetter.py script.

The Python COM gateway class pattern is one I give dozens of times on this blog so I will skip details of that. The key magic is in the FilePropertiesSetter.changeSingleProperty() method which I give now without error handling ...

1 properties = propsys.SHGetPropertyStoreFromParsingName(self.filename, 
                            None, shellcon.GPS_READWRITE, propsys.IID_IPropertyStore)
2 propKey = propsys.PSGetPropertyKeyFromName(propName)
3 newValuesType = (pythoncom.VT_VECTOR | pythoncom.VT_BSTR) if isinstance(newValue,list) else pythoncom.VT_BSTR
4 propVariantNewValue = propsys.PROPVARIANTType(newValue, newValuesType)
5 properties.SetValue(propKey,propVariantNewValue)
6 properties.Commit()

So, essentially this code opens up the file's tag property store (line 1). On line 2 we find the property's key from the property's friendly name (e.g. "System.Category"). Line 3 determines if we're dealing we an array or not to help construct the new property. Line 4 constructs the new value in a form acceptable to that particular library. Line 5 actually makes the change. Line 6 commits the change and closes the file store.

The rest of the script is essentially helper methods.

The scripts has a number of libraries and so be prepared for some installation, some pip install commands. One pitfall I had to code for is when user passes in a two dimensional variant array such as if they had lifted values off a block of cells (I think the StackOverflow questioner was wanting this), the code to handle this is in FilePropertiesSetter.ensureList() which also split a comma separated string into an array (list).

FilePropertiesSetter.py needs to run once, and will request Administrator privileges to register the class with the COM registry.

FilePropertiesSetter.py

import os
import pythoncom
from win32com.propsys import propsys, pscon
from win32com.shell import shellcon
from win32com.server.exception import COMException
import winerror
import numpy

class FilePropertiesSetter(object):	
    _reg_clsid_ = "{5ED433A9-C5F9-477B-BF0A-C1643BBAE382}"
    _reg_progid_ = 'MyPythonProject3.FilePropertiesSetter'
    _public_methods_ = ['setFilename','setTitle','setKeywords','setCategory','setSubject','setComment']
	
    def __init__(self):
        pass

    def setFilename(self, filename: str):
        if not os.path.exists(filename):
            raise COMException(description="Specified file '" + filename + "' does not exist!  Subsequent calls will fail!", 
                    scode=winerror.E_FAIL, source = "FilePropertiesSetter")
        else:
            self.filename = filename

    def ensureList(self, arg):
        # despite hinting that one pass a string it seems Python will accept a VBA array as a tuple
        # so I need to convert tuples to a list, and split csv strings to a list
        # and flatten any 2d tables to a list

        try:
            if type(arg) is tuple:
                list2 = list(arg)
                
                if numpy.ndim(list2)>1:
                    # flatten any two dimension table to a one dimensional list
                    return [item for sublist in list2 for item in sublist]
                else:
                    return list2
            else:
                if isinstance(arg,list):    
                    return arg
                else:
                    return arg.split(",")

        except Exception as ex:
            raise COMException(description="error in ensureList for arg '" + str(arg)  + "'\n" + (getattr(ex, 'message', repr(ex))) ,
                    scode=winerror.E_FAIL, source = "FilePropertiesSetter")

    def setTitle(self, title: str):
    	# https://docs.microsoft.com/en-us/windows/win32/properties/props-system-title
    	self.changeSingleProperty( "System.Title", title)

    def setKeywords(self, keywords: str):

        # https://docs.microsoft.com/en-us/windows/win32/properties/props-system-keywords
        self.changeSingleProperty( "System.Keywords", self.ensureList(keywords))

    def setCategory(self, category: str):
        # https://docs.microsoft.com/en-us/windows/win32/properties/props-system-category
        self.changeSingleProperty( "System.Category", self.ensureList(category)  )

    def setSubject(self, subject: str):
        # https://docs.microsoft.com/en-us/windows/win32/properties/props-system-subject
        self.changeSingleProperty( "System.Subject", subject)

    def setComment(self, comment: str):
        # https://docs.microsoft.com/en-us/windows/win32/properties/props-system-comment
        self.changeSingleProperty( "System.Comment", comment)

    def changeSingleProperty(self,  propName: str, newValue):
        propKey = None 
        if hasattr(self,'filename') and self.filename is not None:      

                try:
                    properties = propsys.SHGetPropertyStoreFromParsingName(self.filename, 
                            None, shellcon.GPS_READWRITE, propsys.IID_IPropertyStore)
                except Exception as ex:
                    raise COMException(description="Could not open properties for file '" + self.filename + "'\n" + (getattr(ex, 'message', repr(ex))) ,
                            scode=winerror.E_FAIL, source = "FilePropertiesSetter")
            
                try:

                    propKey = propsys.PSGetPropertyKeyFromName(propName)
                except Exception as ex:
                    raise COMException(description="Could not find property key for property named '" + propName + "'\n" + (getattr(ex, 'message', repr(ex)))  , 
                            scode=winerror.E_FAIL, source = "FilePropertiesSetter")
                    
                if propKey is not None:
                    try: 
                        newValuesType = (pythoncom.VT_VECTOR | pythoncom.VT_BSTR) if isinstance(newValue,list) else pythoncom.VT_BSTR
                        propVariantNewValue = propsys.PROPVARIANTType(newValue, newValuesType)
                        properties.SetValue(propKey,propVariantNewValue)
                        properties.Commit()
                    except Exception as ex:
                        raise COMException(description="Error whilst setting value ...'\n" + (getattr(ex, 'message', repr(ex)))  , 
                                scode=winerror.E_FAIL, source = "FilePropertiesSetter")

def RegisterThis():
    print("Registering COM servers...")
    import win32com.server.register
    win32com.server.register.UseCommandLine(FilePropertiesSetter)

if __name__ == '__main__':
    RegisterThis()	
    pass

def Test():
    propsSetter=FilePropertiesSetter()
    propsSetter.setFilename(r"N:\FileProps\Newbook.xlsx") # use your own filename (obviously)
    propsSetter.setKeywords("python,keywords")
    propsSetter.setCategory("python,category")
    propsSetter.setTitle("python title")
    propsSetter.setSubject("python subject")
    propsSetter.setComment("python comment")

After FilePropertiesSetter.py is run once and correctly registered (don't forget you may need some installation) then it is scriptable from VBA with code like the following ...

Option Explicit

Sub TestPythonClass()

    Dim objPropsSetter As Object
    Set objPropsSetter = VBA.CreateObject("MyPythonProject3.FilePropertiesSetter")
    
    objPropsSetter.setFilename "N:\FileProps\Newbook.xlsx"
    objPropsSetter.setTitle "VBA Title"
    objPropsSetter.setSubject "VBA Subject"
    objPropsSetter.setComment "VBA Comment"
    objPropsSetter.setKeywords "Foo2,bar"
    'objPropsSetter.setKeywords Array("Foo1", "bar1")
    objPropsSetter.setCategory Sheet1.Range("A1:B2").Value2

End Sub

You will need to call setFilename because that is how the script knows which file to operate upon.

Enjoy!